↓
 
PolyWogg Frog, small image of a tree frog

The Writing Life of a Tadpole

My view from the lilypads

The Writing Life of a Tadpole
  • Home
  • Astronomy
    • Ottawa Astronomy Events
    • A PolyWogg Guide to Astronomy
    • Targets
      • Astronomy Targets
      • Astronomy Targets – RASC Wide-Field Astroimaging Certificate
      • Astronomy Targets – RASC Solar System Astroimaging Certificate
      • Astronomy Targets – RASC Deep Sky Astroimaging Certificate
      • Astronomy Targets – 150 Brightest Stars Part 1/6
      • Astronomy Targets – 150 Brightest Stars Part 2/6
      • Astronomy Targets – 150 Brightest Stars Part 3/6
      • Astronomy Targets – 150 Brightest Stars Part 4/6
      • Astronomy Targets – 150 Brightest Stars Part 5/6
      • Astronomy Targets – 150 Brightest Stars Part 6/6
    • Sky charts
    • My Equipment
  • Challenges
    • PolyWogg’s Reading Challenge 2021
    • PolyWogg’s Reading Challenge 2020
    • PolyWogg’s Reading Challenge 2019
  • Government
    • Training Resources
    • PolyWogg’s HR Guide
    • HR Guide – All posts
    • Civil Service
    • Development
    • Governance
    • PS Transitions FP
      • Version in English
        • Main Page
        • Background
        • Report
        • Appendices
        • Organizers
        • Conference Documents
        • Photo Gallery
      • Version en français
        • Page principale
        • Information de fond
        • Rapport
        • Annexes
        • Les organisateurs et les organisatrices
        • Documents de conférence
        • Galerie des photos
  • Personal
    • Family
    • Goals
    • 50by50 – Status of completion
    • PolyWogg’s Bucket List, updated for 2016
    • Humour
    • Quotes
  • Reviews
    • Book Reviews
      • Book Reviews (index)
      • Book Reviews (all)
    • Movie Reviews
      • Movie Reviews – Index
      • Movie Reviews (all)
    • Music Reviews
      • Music Reviews
      • Music Reviews (all)
    • TV Reviews
      • TV Reviews – Series (Index)
      • Television (all)
  • Writing
    • Computers
    • Experiences
    • Ideas
    • Learning
    • Libraries
    • Photography
    • Publishing
    • Recipes
    • Spiritualism
    • About Writing
  • Info
    • About PolyWogg
    • Contact / Subscribe
    • Privacy Policy
    • Go to Astropontiac.ca
    • WP colour choices
  • Gallery
    • 2005
    • 2006
    • 2007
    • 2008
    • 2008 – The PandA Wedding

Tag Archives: options

Boy with tongue out while looking through telescope

So what exactly did I want in an observatory?

The Writing Life of a Tadpole
May 5 2020

A few people have asked, quite surprisingly to me, what kind of observatory I was “letting go” from my long-term goals. Most plebes think an observatory is simply a place to put your scope and observe the sky, and while they are not completely wrong, it is much more complicated than a simple “location-based” definition.

So, let’s start with what I have as a scope:

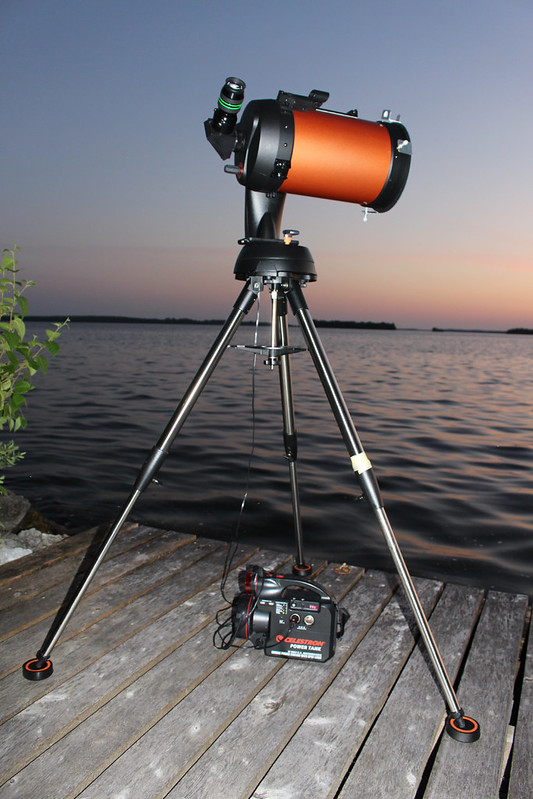
That set-up is made up of nine things:

  1. A physical site:
    1. A location to do the viewing, preferably with dark skies (this picture is taken at the inlaws’ cottage in front of a lake and big open skies to the west);
    2. A flat platform for the equipment all to rest upon, along with vibration suppression pads under the tripod legs; and,
    3. Some sort of limited area around the space;
  2. Observing mechanics:
    1. An optical tube — the orange part, which is a Schmidt-Cassegrain telescope (SCT) design;
    2. A mount — the small black base with a computer in it and an arm that rises up from just below the tube to attach at the far side of the scope; and,
    3. A tripod — the silver part, with the three legs fully extended;
  3. Accessories:
    1. An eyepiece (black with green banding at the top back of the scope);
    2. A power source, which is a portable power tank (this model is very similar to a car battery); and,
    3. A place to hold accessories, which is a flat area just below the black mount, very hard to see in the photo although there is also a table out of range of the camera;

For most observing, the parts are inter-related. If you are away from power, you’ll want a portable power tank; if you’re in your backyard, you can run an extension cord. If you are using a permanent observatory, you’ll likely mount your scope on a cement/concrete pier; if you are travelling, you’ll likely use a tripod that expands and folds.

A physical site for observing

The three groupings mentioned above are done in “sub-bundles”. For observatories, the location, the space, and the platform all go together, with three standard options.

i. A prefab structure with a dome structure

These are usually tight little designs with an opening on top, and a swivelling roof that you can open (so the scope can see out while blocking any light from the sides) and rotate in any direction. But if it looks tight, it is because it is. Note the little handle on the front panel — that’s your door, and you have to duck under the roof rim to get in there. Plus, once you’re in there, it’s pretty cozy. And that is usually starting with an 8’x8′ footprint.

ii. A small shed with a roll-off roof (RoR)

These designs are incredibly prolific with tons of different layouts and designs for how the roof rolls off, whether it is motorized or not, how it slides, what angle it slides off at, etc. Companies like Sky Shed will sell you domes like above, or plans, or kits, or the whole shebang together, and you can even hire someone to come and do it for you. The size of the footprint varies, but most occupy at least 8’x8′. Many are 10’x10′. Some are modified and are only 6’x8′. Usually they have the same basic layout — a box shed, with some arms out to the side where the roof “rolls” to, exposing the interior of the building to the night sky.

The buildings can be anything from a basic shack to a really nice looking cabin. But generally, they are all 8’x8′ or bigger. But note the “frame” beside the building — this is where the roof rolls/slides “off”, so if you have an 8’x8′ structure, you need an empty 8’x8′ space right beside it. If you use the dome (i) above, it just rotates, so it holds to the 8’x8′ space.

iii. Some sort of roll-away building

Option (i) swivelled the roof; option (ii) slid the roof to the side; option (3) moves the whole building out from around the scope. Some people call them roll-away observatories. Others call them outhouse observatories as they are often little tiny, outhouse-sized buildings sitting tall around the scope. Others go with a birdhouse design (single pier coming up, and then a box around the scope) and they are called motel-o-scopes. For me, it is more like a phone booth. You open the door, your scope is inside. If you want to use it though, you roll / slide the phone booth out of the way and there’s your scope left sitting by itself on some sort of stand (usually a pier). Here’s a typical outhouse style.

The image isn’t entirely fair, it’s a 4’x6′ which seems pretty compact, right? That one is actually even larger than most, there are more compact designs. But you can see that the rails behind it, where the whole thing would move backwards and the scope inside would seem to “slide out” the front (but of course it doesn’t move at all, it’s fixed, it is the building that moves). By contrast, motel-o-scopes usually look like this with the top coming off:

Some people go for a full prefab metal one, with a similar footprint to the outhouse:

As you can see, they’re not that attractive usually. However, there is also something lost in translation for a lot of these options, which is that while you can build small observatories, the actual size and the functional size are misleading.

Most astronomers don’t spend time in their small observatories

For the domed option, and the small-footprint ones above, the observatories are mainly just for imaging, not visual observing. They set up the scope for the roof, angle, etc., and then go work their laptop. Likely from inside the house or at least from some place warm. They basically use their observatory as a “remote viewing” option. Perfect for imaging / astrophotography.

But they rarely if ever do visual observing with these set-ups. Why? Because the dome and the closet-sized ones are too tight to move around in. The big huge ones will do both, but the smaller ones are mainly for imaging.

Can I use a small footprint observatory? Not really. I am mainly a visual observer. I do a bit of dabbling in astrophotography, but I primarily want the observatory for visual. Let’s look at the options.

 Roll-off RoofDome Roof Observatory

Motel-O-Scope/
outhouses

Telephone booth hybrid
SizeOften 8’x8′ or greater8’x8′2’x3′~4’x4′
UsesVisual or imagingImagingImagingVisual or imaging
Capacity

Scope
Tripod or pier
Electrical
Lighting
Accessories
Desk/Table

Scope
Pier
Electrical
Scope
Pier
Scope
Pier
Electrical
Accessories
Design
Prefab or customPrefabCustomCustom
Appearance
High-qualityMechanicalFunctionalFunctional or basic
Cost
$$$$$$$$$-$$$-$$$

My options for just a slab

As I have already mentioned, I don’t have room in my backyard for an 8’x8′ footprint (dome) nor twice that for one with a roll-off roof. I would absolutely love a full-sized 8’x10′ observatory, complete with a roll-off roof, maybe even a modified roof that would allow partial opening rather than full roll-off. Maybe walls that lower to ensure full horizons, although, in my backyard, that wouldn’t be necessary (even if I lower the walls, there are houses at the angles). I’d even love to raise it up a bit. Have space for some chairs, a table, maybe my laptop. A place to properly arrange all my accessories. Electrical power, fans for the summer, heaters for the winter. And lord, the ability to use it in the winter would be heaven. No shovelling snow to have space, no setup in the freezing cold with bare fingers and a metal telescope, I could just get everything ready to go, open the roof, look for a while, shut it back up, and go inside for cocoa. Out of the wind, away from the elements. A permanent place with lock and key, maybe even a security system, a place for everything and everything in its place. Ah, the dream.

Now, as I said last week, I knew generally that I could never have one of those full-sized observatories. But I had a small niggling hope that perhaps I could come up with something with a small footprint that would work. With some planned yard work including some flowerbeds, I wondered if perhaps we could upgrade my viewing options and start with a slab.

My tripod has a 43″ inch spread from leg to leg, and if you draw a line from one leg to another, and then bisect that to go to the third leg, the distance is 36″. In other words, if you put the two back legs against a wall, the front one will stick out about 37″. Alternatively, you can think of the tripod lying on the circumference of a 5′ diameter circle for it’s footprint. And it is those outer points of the legs that present the biggest challenge. Normally, if the scope is in line with a tripod leg, it’s a bit annoying to get close enough to the scope to see properly. The tripod leg is in the way, you don’t want to risk kicking it, and if you are crossing over from one area to the other, you want to be able to do so easily without backing into things behind you either.

If you think of the tripod and the viewing circle, and place it in a standard 6’x6′ slab, you get the following layout. The green is the available space (slab), the blue triangle is the direct area covered by the tripod, and the orange area represents what happens if you setup the tripod randomly in the circle (it would circumscribe the orange circle). As you can see, there is not a lot of space outside of the orange viewing circle, and within the circle but outside the triangle, different spots are tighter fits.

This suggests that a 6’x6′ slab is not likely to work. I’d likely need something larger. But the larger it gets, the more real estate I’m taking up in the backyard. And the best spot is right in the way of everything else. So I started thinking about the layout of the tripod.

Someone online noted that he set up his tripod in a specific way each time. So in a sense, the orange circle is less important. He put the two legs farther to one side, centred the rest, got a perfect set-up for everything, and then actually marked and drilled holes in his cement slab where the legs were sitting so that EVERY FUTURE time he set up, they’d be in the same spot. With the same 6’x6′ slab, it would look more like this:

For those into math, he was trying to centre a weighted average of the tripod dimensions over the centre of the square. I got to thinking maybe I could do the same. I could set it up so the slab would not be proportional for ANY and ALL setups, but rather just right for ONE specific setup in particular. Since most of my viewing is to the south and west, I could choose the orientation that would give me the most room for THOSE directions, while minimizing the viewing space on the right. If I did it to an extreme, I could put the tripod all the way to the SOUTH and WEST corner, leaving me all the space at the NORTH and EAST corner.

But in my backyard, I could only see three places to put that slab:

  • In the centre of the yard, messing everything up for everyone;
  • At the bottom of the stairs, also messing up most of the backyard usage; or,
  • Next to the stairs, off to the side, a possible 6’x6′ space, with me eating up 2’x4′ of dead space that will likely to become a flower bed and another 4’x6′ of lawn space.

Unfortunately, the more I worked on that last option, the less enamoured I became. It is really close to the back fence, a tight space, and not that great for viewing to the west. I looked at it again tonight, just to refresh my memory, and it isn’t as bad as I thought since it opens up some sky to the east. Of course, any viewing to the east or west is problematic because I’m viewing over top of houses that give off heat, but I also lose a small chunk of valuable sky to the south-west where I’m frequently trying to capture planets in the 10:00 p.m. to midnight window.

I hemmed and hawed, hawed and hemmed, gotta be this or that, and I decided no go. It would just seem too claustrophobic jammed in there behind the scope and tripod.

When ideas lead you down garden paths

The pandemic has been kicking my heinie for work or lack thereof, and I have a bit of cabin fever. So when a simple brain fart happened, I forgot my “it doesn’t work” analysis and conclusion above and let the idea lead me astray like a wicked temptress in a seedy bar.

So, let’s recap. Big RoRs are out; domes are out; small footprint ones for imaging only are out. I can’t find a setup that is the right size to leave my scope in all set up either, not easily. A slab in that 6’x6′ spot wouldn’t be great, but what if I just put a storage shed there. I had looked at some pre-fab sheds and even found a couple that would seem to fit the bill.

I was thinking I could put this in the 6’x6′ space, store all my gear in there, pull it out and use it, save me lugging back and forth to the garage. Andrea was worried about the soccer ball hitting it, which is admittedly not ideal, but as long as my scope wasn’t against the walls on the inside nor were we talking about kicking it against the building repetitively for hours, my gear would be fine. I found another one, slightly different design, maybe it would work too. I figured Andrea could choose which one looked better to her.

It has the slightly wrong orientation, but it’s a different style design, either could be fine. And then I realized something.

While both fit the 6’x6′ footprint, they are taller than I need. I basically need 5′ to clear the top of my scope. 56″. These babies? Over 7′ to the peaks. In other words, not only way higher than I need, they would even go above the fence line and REALLY blocking the view from our gazebo. It would even be starting to block our view from the house.

So, again, I ruled them out. I wasn’t that initially invested, it was just a storage shed.

Until I got ANOTHER brainwave. Much of that “space” consideration for a slab, i.e. the square/circle/triangle diagram above is controlled by the triangle. How much space my tripod covers. But I don’t need to set up my tripod if I’m doing an observing space that was out of the way. I couldn’t put a pier on a slab in the middle of the yard or in the middle of the stairs area, but over off to the side out of the way? I could, in fact, do a permanent pier. If I used the same 6’x6′ space, I could use a pier and have a layout that would be more like this.

6’x6′ footprint, represented by the green. An orange 6′ diameter viewing space since there would be no tripod legs in my way. And a blue pier 4″ in diameter in the geographic centre of the working space. Lots of space to move around it, not claustrophoic at all. Wait a minute, sister, we might have a winner!

I thought I was on to something

As I said, I got excited. The slab area doesn’t work well, that’s still mostly true. But it occurred to me that if I was to raise the level of the viewing area to match the deck by essentially extending the deck into that space, and raising the pier up by another 2′, I could have a pier up through the deck extension, a 6’x6′ viewing area around it, plus an opening behind me to the main deck, so I could either centre the pier or shift it slightly off-centre reflecting that extra viewing area on the deck.

My brain started to explode with possibilities, and reality was NOT filtering any of them down to viable options. I toyed briefly with the idea of putting some sort of building like the sheds above, prefab and cheapish (relatively speaking). But I was already going to have to pay someone to build a deck extension that would require 2 posts plus the pier for holes in the ground, permit approvals too. Plus pouring the pier itself, including specifications to embed some metal rods to use to attach the telescope mount. I averaged it out to the 56″ height I have now for the tripod, add a couple more for the tube to overlap, call it 5′ total, with the pier portion likely representing 3.5′ of that 5′.

Right, so the prefab buildings were too big. And too expensive. One is almost $2K all on its own, not counting the build of the deck and pouring the pier. I’d also have to modify the shed to be removable. And, oh yeah, they are probably too high.

But I’ve researched a lot of options for those outhouse-style observatories. Or the telephone booth design, as I like to call it. Could I do one that would allow me enough space to cover the scope on the pier (5′ tall, 2′ wide) and maybe have some room for some accessories, a shelf or two, and wheels for it to roll away on? I could. I even have a couple of ideas on how the walls could hinge to open around it like a telephone booth door, turn and roll away onto the deck out of the way. It could even block light or wind from various directions if I need it. Let’s call it maybe 2′ x 4′, or up to 4’x4′, opening up to a small “temporary wall” of 2’x8′ with all my gear hanging on it. Glorious idea.

My friend Stephan knows someone who does custom work, they could likely do the deck and the pier easily enough, and would be willing to build me a shed on top. Except that “custom work” adds up way too fast. As much as I would like it, it just stacks the cost too much.

I stepped back and went through all the steps I would need to do the custom shed part myself. I would still need someone to build the deck extension and pour the pier, but the rest? I could just about handle it all myself. Maybe with a little design help online.

I found a design that was similar to what I have in mind, a guy made it in the local club so I could likely go to his house even and take measurements. And I very excitedly showed it to Andrea.

Who pointed out that it was ugly. Which it was. Kind of like some of the ones above. But the worse news is that his “ugly” one was WAY nicer than anything I would ever come up with. If she thought that one was ugly, my version would be an eyesore. Sigh.

So I went back to trying to contain the cost with an existing prefab. It would be hard to modify and put wheels on, but I gave it a go. All of the options were either too short/tall, ugly, or expensive. Or all of the above. One had some potential, but the shed itself was more than $2K, AND I would have to do a bunch of custom work just to get it to fit.

Then I realized too that basically NO option was ever going to work in that space. Even if I held it to only 5′ high, it’s going to be higher than the fence line when raised up on the deck (which is 2′ off the ground) and higher than the shed that was just going to be on the ground. That one got ruled out because it would block the gazebo and house views; this one would block it even more. Well, fiddlesticks.

And that is where I crashed hard. The re-ignition of a dream, a possible way forward, cabin fever, and a working solution that I came up with on my own got me REALLY excited. Too excited. I should have known better than to let my hopes run free. Particularly in the world that we’re living in right now.

I am still playing with secondary options

I really struggled to pull myself out of the letdown phase. Particularly as even if it was feasible, I don’t have the skills myself nor can I afford the extra cost to make it look “nice” enough to proceed.

I haven’t completely given up on the idea of a 6’x6′ viewing area there, with a pier. I just can’t have it as a permanent observatory with a building. Going back to that initial definition, yes to the neighbourhood, yes to the backyard, meh to being over to the side but I can live with it, yes to a pier rather than tripod legs, and yes to a metal plate on top that I will attach my mount to for holding the tube.

The difference is that I will just have the 4″ pier (or whatever size is appropriate), and the plate, and nothing else there most of the time. When I want to observe, I’ll attach my mount on to the pier, and the scope on to the mount. When I am done for the night, I’ll take everything off, and rather than putting any sort of “box” around it, I’ll just put a pier condom over it (like a wet bag) to keep everything dry. It’ll be about 4-5″ in diameter, maybe 3.5-4′ tall, and that’s it. I’ll have to put a chair or something in the way so people can’t hit it. Or I could do what some people do and put a small tabletop on it to use for drinks and things, make it look like part of the deck. It’s an option at some point to consider. Not a full observatory, but a pier isn’t a terrible compromise. I could settle for the slab and pier, but I think it would be way too tight. I’d have to decide if that was worth it or not. Regardless, it’s an upgrade to have a stable pier over tripod legs.

Since one of the limiting factors is the time it takes to move all my gear from the garage to the backyard, I looked into an option to have a storage shed on the deck, back out of the way, not blocking any view, maybe something big enough to put my scope in that I could open up, pull out my scope already set up and be good to go. None of the pre-fab buildings fit the space, nor can I build anything nice enough myself. I could consider having something custom built there if I don’t do the deck extension, but I’m not thrilled by the idea of storing my gear there if I don’t get a huge improvement in my set-up time.

So I have also been actively looking at wagons. I think I have one that will work for me, and I even found a Canadian distributor, finally. That was surprisingly harder than I expected, but it’s worked out now. I found a few distributors, but they looked sketchy — websites with no physical location behind them. Selling garden equipment? Nope. I had to compromise on the version, not exactly the model I want, but it works, and it is $250. No rush to get it though as I would have to have a place in my garage to park it and be able to load everything into it while still being able to lock stuff up easily plus keep it all clear of dust, etc. I would prefer not to have to back my car outside to do it, that’s partly how I ended up not closing the door and having stuff stolen, but hopefully once bitten, I’ll be twice smart enough not to leave stuff open to being stolen so easily. But on the positive side, building a small “hut” in my garage is about functionality, not “look and feel”, and my skills can handle that at least. It won’t be pretty but in my garage, it doesn’t have to be. When I’m ready to do that, i.e. after cleaning a bunch of crap out of the garage and clearing enough space for everything, I can do all of it myself. Nice.

I still have to look into the tips for letting go more, even after I’ve negotiated myself down to something better than what I have now, and I’m still going to look into easy-to-access sites within 20 minutes drive of my house to give me better viewing options. But the observatory idea is dead; I’ll have to settle for being able to improve my options.

Signature, happy reading
Share
Posted in Astronomy, Goals, To Be Updated | Tagged depression, dreams, observatory, options, telescope | Leave a reply
Boy with tongue out while looking through telescope

Best accessories for the Celestron Nexstar 8SE

The Writing Life of a Tadpole
October 23 2017

A new owner of an older 8SE asked me what I thought were the priority accessories to get to go with the stock package (mount, OTA, and 25 mm Plossl). I thought it would be an easy answer, and then realized it is almost as difficult to answer as what scope would be best for someone. But I did respond and thought I could maybe turn it into a post too. Obviously it all depends on what they want to look at the most and from where. Maybe even with whom. Nevertheless, here are my thoughts on some extra considerations.

A. A good power source. I have the Celestron Lithium-Ion tank, which seems to work well for me, but I wouldn’t necessarily want to use it for a 12-hour viewing excursion. I have two old Powertanks and I may try to revive them to just use as a backup.

B. Tools to help with levelling. A simple bubble level, or apps like Cliniometer for an Android phone. I need it to make sure the scope is level before trying to align.

C. A tool to help with GPS. If you know where you are going beforehand, Google Maps will give you the coordinates. Or use an app like GPS COORDINATES for your Android phone.

D. Something to replace the spotter. The 8SE comes with a red-dot finder that just about everyone hates. And a TelRad works awesome. Huge upgrade for me for a low cost. One of the best additions I ever did. But if someone rarely does manual spotting other than at the first couple of alignment stars, the red-dot might be good enough.

E. Something to help with Skymaps. A simple sky map, a book, or an app, all of them will work to give you an idea of what is up there to look at. I like Stellarium and Sky Safari.

F. Dewshield. I don’t know that I use the “dew” part that much. I don’t often observe into the morning hours, I don’t often observe on grass, and I’m not often observing for a long time for it to heat up. However, the added benefit is that it provides a light shield to the front of my scope. Blocking out stray light from the sides. I have had dew problems from time to time, but I wouldn’t say a lot, and I have no idea if my screen would have it without the shield. Perhaps. But again, you could wait and see if you have problems.

G. Vibration suppression pads. Great if you’re using a deck or dock, also good even if you’re in dirt or sand and the legs “sink”.

H. Red light flashlight. They’re available everywhere, often even dollar stores, and thus not super expensive. Great for showing respect for other astronomers (white light is deadly to night vision). I prefer one with an optional white light for the end of the night when I’m packing up.

I. Green laser pointer. This is definitely not a priority, but a great tool to have if you’re explaining stuff to other people and you want to point to various stars.

J. Good chair. I like being able to sit at the telescope and stare at a few things without having to stand for hours bending awkwardly for some objects. I have one with variable height which is great.

K. Stool. If you are viewing with children, a simple step stool of some sort can save a ton of grief trying to adjust to everyone’s height.

L. Storage and transport containers. There are a lot of little parts and they can get lost easily. I use a grocery bin to carry all my accessories, and most of them are kept within plastic kitchenware containers with lockable lids. Nothing is going ANYWHERE I don’t want it to go. I use a large gym/travel bag for my scope. Tables and chairs and mounts, oh my, all travel basically as they are.

M. Photography accessories. You can do impressive but basic AP with an 8SE, it’s not designed for AP, not really. Now, how do you get images?

  1. Take photos by hand of the night sky. Not great.
  2. Take photos with a tripod of the night sky. Much better.
  3. Stand at the eyepiece with your smartphone and try to centre it by hand to take a pic of whatever you’re looking at…not a very effective method most of the time. iPhones with the NightCap app work the best.
  4. Get a small mounting bracket that attaches to your smartphone (Android or iPhone) and to an eyepiece, and then take photos. Much better result.
  5. Get a small mounting bracket and attach a compact camera to your telescope. Very frustrating experience.
  6. Get a webcam of some sort, tied to a laptop, and take stills and video. Good result, but more expansive setup and a huge range in quality and price.
  7. Get a series of rings and adapters and connect your DSLR camera directly to the telescope, takes a lot of practice and more than the scope is really designed to handle. Doable.

N-Z. Optical accessories

Star diagonals help a lot to protect your neck and back from injuries requiring chiro or massage.

Colour filters can help bring out details in planets.

Oxygen III and ultrablocks can help with things like nebulae.

Tons of options out there, and it all depends on what you want to look at most often, and in how dark of skies.

And I haven’t even talked about eyepieces. I think for my use, I need three lenses approximately, plus a 2X Barlow (it halves the size of your eyepiece, basically).

While the 8SE has a theoretical limit of 4mm to take it to 500x magnification, practical use outside of dry dark skies is likely somewhere between 200x and 300x.

The stock 25mm is great for basic things, even a bit of planetary stuff, and not bad for galaxies, nebulae, etc. with a magnification of 81x. With the Barlow, I also get 12.5mm or 160X-ish.

My favourite lens for more power is a Televue Delos with a great field of view at 17.3 mm. 9mm-ish with the Barlow and that puts me at the usable max most of the time.

I also have a 32mm lens which is pretty great. Good for bright chunks of the sky and making things nice and bright. With the Barlow taking me to 16mm, not much different than my 17.3 so would use that instead.

Finally, while those three EPs are probably my workhorses, I also have a big 42mm 2″ EP. A huge chunk of sky. Great for large regions, like the Veil Nebula.

And I don’t have the technical know-how to go much beyond those size issues to talk about eye relief and field of view very reliably.

I’m sure there are lots of other things to mention, but the optics depend so much on the person and their targets, there’s not much to add other than my own preferences.

Your mileage may vary.

Signature, clear skies
Share
Posted in Astronomy | Tagged 8SE, accessories, astronomy, Celestron, NexStar, options, viewing | Leave a reply
Boy with tongue out while looking through telescope

Best alignment process for the Celestron NexStar 8SE

The Writing Life of a Tadpole
October 22 2017

I’ve blogged about my challenges and successes (Finally learning with the Celestron NexStar 8SE and Solving alignment problems with the Celestron NexStar 8SE), so I thought I would do a quick summary of the proper way to align my scope in case it helps others.

Here are my “four” options, although the first two are obviously tongue-in-cheek:

A. Give up — either get a different scope or take up knitting…I actually thought about both.

B. Do it wrong for five years until two people help you figure out why it’s not working (see above two posts).

C. Regular Auto Two-Star alignment – Short version…I’ll give the full write-up below with all the bells and whistles, but this will just be the short process steps.

  1. Setup tripod;
  2. ** If you are using a wedge, add wedge plate underneath;
  3. ** If you are using vibration suppression pads, set them under the legs;
  4. Add mount/arm;
  5. Attach Optical Tube Assembly (OTA), and then retighten the supporting plate on the tripod with the new weight on it;
  6. Plug in the power source;.
  7. Turn on scope, lower tube to a horizontal position, turn off scope;
  8. Level the scope;
  9. Turn on scope;
  10. Align spotter scope or TelRad or red-dot finder;
  11. Press enter to start alignment;
  12. Change to AUTO TWO-STAR;
  13. Hit BACK/UNDO to go back to CUSTOM SITE, enter GPS COORDINATES;
  14. Enter time, date, DAYLIGHT SAVINGS TIME or not, and timezone;
  15. Choose a star from the formal list, centre it roughly in the eyepiece, press ENTER, fine-tune your centring (Up and Right as last movements) by eyeball, reticule or doughnut methods, press Align;
  16. If you used the doughnut method, refocus to a tight star point view;
  17. Choose Star 2, let it slew to near that spot, centre star roughly in eyepiece, press ENTER, fine-tune alignment (Up and Right again) by eyeball, reticule, doughnut methods, press Align;
  18. Wait for “Alignment Success” message;
  19. Test your alignment on the two alignment stars you used;
  20. Turn off your TelRad or another device;
  21. Start looking for new objects!

D. Regular Auto Two-Star alignment – Long version

  1. Setup tripod, extend legs;
  2. ** If you are using a wedge, add wedge plate underneath to ensure legs are at full extension and locked;
  3. ** If using vibration suppression pads under the legs, add them underneath;
  4. Add top of mount/arm if not already attached (I leave mine attached all the time);
  5. Attach Optical Tube Assembly (OTA)…some people attach it with the tube horizontal, Celestron nameplate facing you and readable, tightening knob underneath. I find it FAR easier to have the knob facing left so that I am attaching the OTA vertically with the opening facing up and my star diagonal / backplate facing down. This allows me to rest the star diagonal in my right hand while standing “behind” the arm, and guiding it with my left hand into the mounting rail slot. Then I tighten. By doing this, I also make sure that my star diagonal has clearance underneath i.e. the thickness of my hand, so just in case when I’m viewing I go to zenith, it will clear my base. This works awesome for me. I also then retighten the support plate under the tripod — when the weight gets added, it often goes a bit wider so the plate isn’t “tight” anymore;
  6. Plug in the power source, as the AA batteries drain quickly (which will then make the alignment and mount start to go wonky fast);
  7. Turn on scope, lower tube to a horizontal position, turn off scope;
  8. Level the scope…now that the weight is on it, you need to level it, mostly by adjusting the height of the legs on the tripod. I have both a simple bubble level (allows you to see all directions, not just the one direction that a typical hand level shows you) and an app on my Android phone called Cliniometer / called Bubble level on iOS;
  9. Turn on scope, wait for the screen to clear (about 3-5 seconds);
  10. Align spotter scope or TelRad or red-dot finder. Note: When you are using your spotting tool, the benefit is that it and your scope should be pointing at the same thing, so if you see it in your spotting tool, you should see it in your scope. Therefore, you can use your spotting tool to find something, and then move to your scope. However, this only works if the two tools (spotting tool and telescope) are actually pointing at the same thing as closely as possible. This step is to make that happen before you start trying to align your scope. First, find a distant object on the horizon, like the top of a telephone pole or a tree. If it is already dark, you might have to use something really bright and easy to find like the moon or a really bright star, but it is better to do it in the daylight. Second, use your spotting tool to move your scope so it is pointing close to it, and then look through the telescope to fine-tune your view, centring your object in the view of your scope. Third, once it looks dead centre in your scope, your spotting tool (spotting scope / TelRad / Red-dot finder) have little manual adjustment knobs, dials, or screws to do a small physical adjustment (without moving the scope) so that it points to the same place your scope is looking. At this point, then, your scope is looking at a distant object and is centred on it, AND your spotting tool is now centred on it too. From this point on, you can use your spotting tool to point at anything in the sky, and your scope should be looking at the same object too. [Note: Generally, I find TelRads are the quickest and fastest spotting tool, but some people like having a separate spotter scope mounted. Nobody likes the red-dot finder. However, regardless of the three options, the process is generally the same];
  11. Press enter to start alignment;
  12. Change from STAR ALIGN (i.e. default 3-star) to AUTO TWO-STAR;
  13. It will then ask you for some basic data, but if you have changed locations from the last time you viewed, you should hit BACK/UNDO to go back to where it says something like CITY DATABASE or CUSTOM SITE, and if possible, use CUSTOM SITE. It will then ask you for your GPS coordinates in longitude and latitude by HOURS:MINUTES:SECONDS. Google Maps will give you the coordinates if you go to the exact spot, and then right-click on the spot, choose What’s Here. It shows you decimal coordinates, click on them and it will show them in HOURS:MINUTES:SECONDS. Or skip GOOGLE MAPS and download an app like GPS COORDINATES for Android or iOS which will tell you directly, or use software like Sky Safari or Sky Portal by clicking on settings, current location. It will give you the exact coordinates you need. Enter both longitude and latitude. Ignore the negative sign, it will ask you if it is north/south or east/west. [My coordinates are 45 degrees for latitude and I enter that with minutes and seconds and choose West; -75 degrees for longitude so I enter 75 plus minutes and seconds and choose NORTH to handle the negative part). Note that alternatively you can use the city database, rather than GPS coordinates, but cities are large, and the larger the city, the greater margin of error you are adding to the process;
  14. Enter your time, date, whether it is DAYLIGHT SAVINGS TIME or not, and the timezone you’re in. Best if you can be as accurate as possible on your time;
  15. Now you’re ready to choose your first star. The scope will give you an obvious list of good stars to choose from. If you are like me and aren’t always sure which one is Polaris (don’t ask), or Vega, choose one that you can learn and that you can’t miss. For me, that’s Mizar, and it’s almost always on the list (if it isn’t there, I can do MANUAL TWO-STAR and select it).  I can almost always see the Big Dipper when I’m viewing, and it is pretty clear which one in the handle is Mizar. Plus it’s a double star so if I look through the scope and see it, I know if it is Mizar or I’m off i.e., it’s pretty easy to tell if it is the right one or not. The alignment of your first star takes TWO steps. First, you get it in your FoV generally using your red dot finder (blech) or a TelRad or spotting scope — you just need to get it close enough so you can see it in the eyepiece, don’t worry how close to centre it is. Then, you press ENTER. Now you’re ready for fine-tuning your centring…the important part to know though is that the drive for the scope has slippage in it. To keep it tight, and give yourself the best alignment, you want to be pressing UP and RIGHT as the last two movements on your scope before pressing align. For me, with a star diagonal on my scope, it means I need to be in the upper left quadrant of my eyepiece. Then, when I press UP it will take me down towards the middle, and right will take me the right to get to the middle. If I overshoot either one, I can’t just back up a little, because that would mean going down or left on the hand controller i.e. within the “play” of the scope, and the alignment won’t be tight. Instead, I have to go past the middle points again, back to the upper left quadrant, and then go UP and RIGHT on the hand controller to get to where I think the middle is. (** Note that UP / RIGHT is only “tight” if your motor speed is 1-6 at that point, speed 7-9 would be the opposite.) How do you know if you’re in the “middle”? Three ways:
    1. Eyeball it. Of course, the less precise you are, the greater the margin of error when you’re done. Then press ALIGN;
    2. Use a lighted reticule — this is basically an eyepiece you can buy that has a little red light in it and a grid. It looks like a target screen. You can use your general eyepiece to get in close to the centre, and then this lighted one to get it exactly dead-centre. Then press ALIGN;
    3. Use the doughnut method — this one is completely counter-intuitive. Instead of a “tight” focus, turn your focus knob to make it extremely UNFOCUSED. Your tiny little star will start to look like a small doughnut, then a medium-sized doughnut, then a large doughnut. Which will let you gauge the distance from the edge of the doughnut to the edges of your eyepiece. In other words, instead of guessing if your little marble is close to the centre of a basketball hoop, you’re unfocusing it to the size of a beachball and estimating if your large beachball is centred in the same-sized hoop. Much easier to tell how far from the “four” sides (up / down / left / right). But again, you still want to be going UP and RIGHT as your last movements. Then press ALIGN;
  16. If you used the doughnut method, refocus to a tight star point view;
  17. Choose Star 2 from the list (see some notes below about which combination of stars to choose). You ideally want a star that is in a different part of the sky, at least 15 degrees above the horizon, and preferably, at a different height than your first star (so that it is working with different angles, not just rotation along the same altitude). The great part is you don’t really need to know which is which. Once you press ENTER to choose the star, the mount is going to rotate to that star with its best guess as to where it is. So it might say let’s go to Skat. Except you don’t know Skat at all. Doesn’t matter. Because when it slews to Skat, you’re going to likely see only one really bright star within a Field of View (FoV) of where it stopped. In other words, you’ll just go to the nearest bright star to where it stops, centre it in the same way as you did for the first star, get it close to centre in your eyepiece, press ENTER. Then do your UP and RIGHT to do a final alignment to centre (with eyeballing it, using a lighted reticule, or making it look like a doughnut again). Press align;
  18. You should get a message after a few seconds that says “Alignment Success”;
  19. Test your alignment. Most people will pick a third target and say, “Okay, let’s look at Saturn.” Which makes sense, right? You did alignment on two stars, let’s see how it finds a third. Instead, though, you should tell it to go back to the first star (Mizar in my example above). Because it’s one of your alignment stars, you should be DEAD CENTRE for that star. And then you can tell it to go back to Star 2. If either are not dead centre, something’s wrong with your alignment. And if I had to guess, I would bet it was the UP and RIGHT play for your final alignment. It could also be levelling, or your choice stars, or whatever, but I’m betting you’re off with the final alignment step, it’s the most common. Which part of the alignment was the problem? If you’re generally above or below the star, it was your vertical (your final UP motion) aka your altitude. If you’re generally left or right of the target, it is the horizontal (your final RIGHT motion) aka your azimuth. Note that on my default settings, the UP/DOWN settings were initially set to INVERTED in the menu, so I spent two years doing UP and RIGHT without realizing I was ACTUALLY doing DOWN and RIGHT, thus throwing off my altitude every time. Grrr…;
  20. If your two alignment stars came back solid, you’re good to go. Turn off your TelRad;
  21. Start looking for new objects! Note that objects close to your alignment stars will be the most precise, including those in between. Those objects farther away from those points of alignment will be less precise, but likely still within the FoV of a 25mm eyepiece. That was the default EP sold with the 8SE in most cases, and apparently the accuracy of the scope was kind of geared to it.

Choosing good stars

What are the best two stars to choose? There are some basic tips online ranging from types of two-stars (generally at different altitudes, not complete polar opposites, both more than 15 degrees above the horizon, etc.) to specific suggestions. On CloudyNights, a guy named Curt B posted back in 2015 and suggested the following stars:

  • January: Capella & Aldebaran
  • February / March: Sirius & Rigel
  • April: Regulus & Procyon
  • May: Regulus & Arcturus
  • June/July: Vega & Arcturus
  • August: Altair & Deneb
  • September: Altair & Rasalhague/Vega
  • October: Altair & Vega
  • November: Altair & Caph/Vega
  • December: Enif & Hamal

As I mentioned above, I often choose Mizar if it isn’t too high because it is so CLEARLY Mizar and not something else. Most people start with Polaris as they are confident they can find it. Depending on my light polluted skies, I’m not always 100% sure. Mizar has no doubts. Some people like software combos on their desktop to make a list and http://www.ilanga.com/bestpair/ has some free software. It has been superceded by a program called AstroPlanner, but you have to pay for that one (although it has lots of great functions). If I run Best Pair II, and enter the 15th of the month for 2017 and 8:00 p.m., here is what I get as the best pair in my rough area (Ottawa):

  • Jan 15: Deneb and Arcturus
  • Feb 15: Vega and Hamal
  • Mar 15: Vega and Hamal
  • Apr 15: Vega and Hamal
  • May 15: Polaris and Mira
  • June 15: Bogardus and Markab
  • July 15: Capella and Denebola
  • Aug 15: Capella and Denebola
  • Sept 15: Alkaid and Procyon
  • Oct 15: Alkaid and Procyon
  • Nov 15: Vega and Denebola
  • Dec 15: Alkaid and Altair

None of which are Mizar. Vega, Altair, Arcturus, Polaris and Capella are great choices, eminently “findable” with the naked eye, and would give you one star out of the two to start with for 9 of the 12 months. Not bad.

Alternatively, there is a program by Jean Piquette, and available from the NexStar resource site that Michael Swanson runs. http://www.nexstarsite.com/Downloads.htm#SAS will take you to the program for download. This is a bit more technical than most people are likely going to be comfortable with in terms of setup…you have to edit a couple of text files to put in your info, then run the program, with it spitting out a few files that will tell you good choices. It is based on the 21 “NexStar” alignment stars that it likes by default.

When I run it today, Oct 22, 2017, it suggests the following for my area:

  • Altair Polaris
  • Altair Mizar
  • Vega Polaris
  • Vega Mizar
  • Vega Altair
  • Polaris Mizar

Six combinations of Altair, Polaris, Mizar and Vega, and almost all of which I could find no problem. Overall, I would say that this estimate is far better for me than the other one, although the first one has more range in a choice of possible stars. This one does, however, give out a MUCH longer list of choices too, almost overwhelming in fact.

I’ll keep both programs and see what they give me from time to time. Something else to remember to do before I leave the house though. I’d prefer an app for that, and there ARE some options for downloading things in Sky Portal and/or Sky Safari Pro, but I’m not entirely clear how to combine the lists properly for prioritization. More like “good sets” in general, regardless if they are actually visible tonight or make good combos for tonight compared to others.

But I’m getting farther afield from the original premise — how to align properly for a general process, not which stars are chosen. Hope this helps. Of course, your mileage may vary.

Signature, clear skies
Share
Posted in Astronomy, Experiences, Learning | Tagged 8SE, alignment, astronomy, Celestron, errors, NexStar, options, viewing | 6 Replies
Boy with tongue out while looking through telescope

Finally learning with the Celestron NexStar 8SE

The Writing Life of a Tadpole
June 14 2015

I have a Celestron NexStar 8SE telescope…for those not in the know, that’s an 8″ optical tube on a simple tripod. They call them one-armed bandits (like the slot machines) because there is a single arm that goes from the tripod mount that it rests on up to the tube. Simple, easy to work, but it isn’t very stable, at least not in astronomical viewing terms. It doesn’t allow for much in the way of astro photography due to its limited ability to track the sky over time, thus limiting the photography options of long-exposures. However, there is one feature where the 8SE shines — it’s ease of use.

This was a key ingredient for me in buying a scope, based on knowledge of who I am and the patience I have. If a scope takes 30 minutes to setup, I’m not likely to use it. I need something relatively simple, and the 8SE requires you to basically setup the tripod, attach the scope to the arm, add some power and eyepieces, and you’re good to go. More or less.

The second feature that was a huge selling feature for me is what they call the “go to” feature. You run a simple alignment procedure on the scope, the computer on the mount figures out what stars you are looking at, and after that, it knows where all the other stars and planets should be. So, in theory, you do the alignment, and then after that, you look at a menu, tell it you want to see Saturn, and Bob’s your uncle, the computer will slew your scope around to Saturn. Tell it to show you the Ring Nebula, and bam, there it is.

Except my scope didn’t seem to do that. Sure, it found the moon and planets pretty well, not always dead centre, but certainly within the eyepiece. But beyond that, I have never really seen much. I’ve had the scope just over two years, and while large periods of time in there were “down time”, I have used it a fair number of times. Almost always on my own though, and never with another scope right beside me to show me what I “should” be seeing. Or not seeing, as the case may be. Even in the dark skies near my inlaw’s cottage, I saw interesting things, but no nebulae, no galaxies. Variable stars, definitely planets, but no real deep sky objects (DSOs). It has been rather frustrating, and I was never quite sure what the problem was. A couple of times I felt like almost pitching the hobby, since I didn’t see much more than planets. Cool, sure, but long term without photography? I wasn’t sure what the problem was, but I was determined to find it before giving up the hobby.

A few weeks ago, I was at a star party organized by the RASC Ottawa Centre out in Carp (just west of Ottawa in a dark parking lot). After most of the lookie-loos had left, I was talking to a guy next to me who was showing the Ring Nebula, so I popped over, looked through his scope and there it was, clear as day. I went back to my scope, pulled up the Ring Nebula from my menu, slewed to it, and nothing. Nothing even close to it in my scope. His scope was different from mine (a Dobsonian), but not any more powerful, so I said, “Shouldn’t I be able to resolve it too?”. He said of course, came over, looked through the scope and said, “Hey, your alignment is off”. And with those five words, my random series of possible problems collapsed to a range around one. He adjusted my scope, I looked, and sure enough, there it was, easy peasy lemon squeezy. I didn’t know whether to laugh in relief that my scope could resolve it or cry because I’d wasted 2 years trying to figure out how to work it properly.

The larger range of possibilities

I had been wondering if the problem was amongst a bunch of possibilities. First and foremost, it was possible my eyes were just not good enough to see the faint objects. I am getting older, turned 47 recently, and as you get older, fainter objects are harder and harder to see. But when the other guy put my scope on the Ring Nebula, that possibility was clearly eliminated.

Second, I wondered if my scope wasn’t good enough. I had bought one of the higher-end entry level scopes, but wondered if maybe I’d chosen wrong (sacrificing viewing too much) or just got a lemon with bad optics. But the Ring Nebula was visible, so not optics. Neither the scope nor of eyepieces either.

Third, I had been wondering if maybe it was the suburban skies — perhaps they were just too light polluted for me to see these things, as most of my viewing happens in city parks, etc. While this was a darkened parking lot, it is by no means a dark site, so no problem there.

Last, I had considered it might be an alignment issue, but planets were always aligned, and most large stars like Antares, Polaris, etc. But with this guy’s five minutes of help, all the possibilities collapsed to this one…my alignment was off.

Fixing alignment

As with the larger range above, there are lots of reasons why the scope could be misaligned. With the help of some people online who have the same scope, and the people at the store who sold me the scope, I compiled a list of things to try.

The first thing I had to check was the physical setup. My scope was always pretty level early on, so I had stopped fussing about it too much. Never seemed to make much difference, the computer knew where the stars were, so I was golden, or so I thought. I’ve added a bubble level app to my phone and now use that to try to get my mount as level as possible, still using the vibration pads to limit shake.

Next, I looked at the initial computer setup. Normally, I keep it set for Ottawa and just have to put in the time and location. That has always seemed a bit general to my mind, but since the computer always seemed to figure it out, I went with it before. This time, I upgraded to a wifi connector that ties directly to my phone — which gives it my precise GPS location as well as local time down to the second. Can’t get much more precise than that.

Third, I have been really inconsistent with my choice of stars. I would say generally I was choosing stars in a 90-120 degree section of the sky most of the time. In some cases it was simply because that was the part of the sky I could see, other times it just happened to be where the first few bright stars were located. Other times, when I was particularly impatient, I’d even used planets as one of the three stars in the three-star alignment process. The computer let me do it, and I’d read instructions online that said you could do it — I didn’t realize they were saying you could do it, not that you should do it. Using a planet apparently adds in a lot of variability to the calculations, as does using stars close together. So, I changed my setup — I now use stars as far apart as possible, and try to cover as much of the sky as I can in my setup with three stars far from each other. Almost like an equilateral triangle in the sky.

Finally, I have always had a question about which eyepieces to use when I’m aligning. The scope comes with a 25mm plossl, but I also have a really nice 17.3mm Televue, a 10mm Televue Delos, and an 8mm Televue plossl. I was never sure how zoomed in I should be to say it was centred in the scope but I tended to use the 17mm lens. Both the online community, the help pages for the scope and the store had the same recommendation for change — buy a 12 mm red-lighted reticle eyepiece and use that to ensure it is centred. If that sounds confusing, it is basically a higher powered eyepiece than the one I was using before, and the red light reticle is an illuminated cross-hairs design…put the star in the centre of the crosshairs and tell the computer it is aligned. No guessing if it is in the “centre” of the eyepiece — it’s dead centre when it’s in the cross-hairs.

I had four other possibilities to try messing with if these four didn’t fix the problem … it could have been the mount itself (I had problems with gears meshing last year, but this problem predated that issue); my scope could have been out of alignment on the optics (had already checked that a few months ago, still perfectly aligned); my diagonal coul d have been out of whack (which could be checked at the store); or my firmware on the mount could have been out of date. They were on my list of possibilities affecting my alignment, but the others were easier to check first against “normal” setup.

The results

Apparently, I’ve just been a complete idiot for two years. If the guy at the star party hadn’t told me that my alignment was off, I’d still have been struggling to find the problem. I did the four steps above (physical leveling, wifi with coordinates, better star choices, and a illuminated reticle eyepiece).

Got it all setup, but had a lot of trouble with focusing on stars the night I tried due to haze (just bad seeing), took me more than an hour to align. And then as I was just about done, my wifi connector dropped the signal and I lost my setup. So I took a fifteen minute break, let some clouds pass by, and then tried again. Five minutes and I was done.

First test was a planet, but that was too easy. So I chose the Ring Nebula. And BAM! There it was. Easily seen from my light polluted park. It was awesome. I wandered around the sky on the app just trying out a bunch of things. I still have not seen the big galaxies, not quite sure why those are not resolving but could have been time of day. Clusters are perfect. Double stars. Variable stars. Everything shows up. It isn’t quite centred each time, but it’s within the field of view, so the margin of error is manageable. Over time, I hope that will improve as I improve my alignment procedures.

Overall though, I’m back on track. As I said earlier, I can’t decide between being happy everything is working the way it should or that it didn’t work for the last two years because I didn’t know what I was doing.

I’m sure there are lots of people reading this and laughing because they think anyone who uses a go to scope is an idiot anyway. Feel free to do so, but it just means you missed the upfront side of things. I do know how to star hop, and I can find things, but it’s not how I’m wired…when I’ve done it, I can find stars, but nothing else. Now I can use the GoTo scope to at least let me see what it is I’m supposed to find, and then learn to starhop between things better with some expectation of success. It’s also a bit of the reason why I’ve struggled on my own for 2 years — there are a lot of nobs out there who basically turn into technique snobs and rather than help someone who is learning to do it one way, they instead say “Oh that way is stupid, here’s the only way to do it.” Different strokes for different folks.

But one guy who helped for five minutes with no attitude or judgement altered my entire experience. I’m back “in” for the hobby, and I never even caught his name

Signature, clear skies
Share
Posted in Astronomy, Experiences, Goals, Learning | Tagged alignment, astronomy, errors, options, Ottawa, RASC, star party, viewing | 6 Replies
© 1996-2021 - PolyWogg Privacy Policy
↑